|
Graphics and Photos
Remember, EAPH and FreeForm/FreeForm2 work together but are separate
EAPH hosting and FreeForm/FreeForm2 mesh together to help you create attractive presentations but they are two different services. EAPH is a hosting service where image files (pictures/photos and graphics) are stored for use as ingredients in the creation of descriptions using FreeForm/FreeForm2. So, the first thing to learn is that image files must already be stored at EAPH before they can be used by FreeForm/FreeForm2.
Consider reducing your digital camera MEGAPIXEL settings
This all starts with the photos you take for use in your presentations. Most digital cameras are designed to produce high quality prints. The megapixel settings necessary to produce high quality display on a computer are much less. You will save yourself a lot of time and trouble by reducing your digital cameras megapixels to the lowest setting available when shooting photos for use on the web (eBay, etc). No higher than 2 megapixels is best.
Optimize your photos: Crop - Cutaway - Reduce - Compress
With EAPH hosting you are in control over the appearance of your photos. No automatic adjustments are performed. Yet optimizing them either with graphic/photo editing software on your home computer or using the tools built into EAPH is still important. This is to your advantage because optimizing photos using such interactive tools will produce much better results than any automatic adjustments could.
|
"Save For Web" or "Save As"
Many graphic/photo editors include a "Save For Web" feature. Look for that feature in the editor's tool bar under "File". If not available, look instead for "Save As".
-
Using "Save for Web" or "Save As" provides for assigning a new name to avoid overwriting the original. You'll need that for cutaways and to otherwise preserve the original for safe keeping.
-
"Save for Web" often provides for adjusting compression with a preview of the result. With "Save As" look for options related to the JPG (JPEG) file type.
|
Crop: With graphics or photo editing software this is accomplished using a tool that enables you to select a rectangular portion of the photo to retain while removing everything surrounding it.
Cutaway: A great way to show important detail in your photos is to use a crop-cutaway technique. Before reducing the size of your photos select small portions of them using a cropping tool and save the portions you cut out as separate files.
Reduce: With graphics or photo software this is accomplished by use of a tool that enables you to select a different width and height for the photo. A good target is to end up with a photo that is no more than 800 pixels wide and no more than 600 pixels high.
Compress: The JPG (JPEG) image file format is ideal for use on the Internet and in auctions. The ability to adjust compression is an important part of the JPG format. The goal is to adjust compression as high as one can up to where you can actually SEE diminished quality. Thus a preview is ideal. Often compression is presented in terms of a quality scale of 1-100. When no preview is present setting to 80 on that scale is usually perfect.
Upload to your EAPH Hosting
Uploading is the process of copying/transmitting files from your home computer to the EAPH servers (powerful computers located in Data Centers with extremely high speed connections to the Internet). Although the EAPH servers are capable of receiving and transmitting data very quickly, the files that you send to them can only travel as fast as the connection you have with the Internet from your home. Additionally, almost all Internet connections are pre-configured to produce much slower upload speeds than download speeds. So, optimizing photos on your computer (as discussed above) before uploading will dramatically improve uploading speed.
To upload files from you computer, log into your EAPH launch-pad per the instructions in your "Welcome" email and click on the iDrive2 link. As soon as iDrive2 loads it will usually be best to create a new folder into which to place the files you upload. Using folders helps keep you organized and improves the general performance of iDrive2. Each page of iDrive2 displays the contents of one folder. Folders are created in the "Folder Section".
Go into the folder that you want your files to be uploaded into, and then go to the Upload Section of THAT page to perform the uploading.
EAPH Uploading/Optimizing options
Ideally your photos will already have been optimized prior to uploading. That's usually the most efficient procedure for you. If photos are already at the file size and dimensions you desire choose "do nothing" to the photos as they are being uploaded via either of the two methods below.
JavaUpload2: Allows for selection of multiple files or even a whole folder on your computer. When an option to reduce files is selected, the reductions occur prior to uploading which speeds the process dramatically. "Drag and Drop" and "Copy and Paste" are supported as well as a Browse window to locate the photos on your computer to be uploaded. Here's a demonstration: JavaUpload2 Demonstration
Basic Browse: Reduction and compression is applied with a different method than that used by JavaUpload2. Some photos may end up with a slighly better reduction result. If you have borderline quality photos to begin with then the Basic Browse, even though it takes longer to use, is the better choice. Here's a demonstration: iDrive2 Basic Browse Upload Method
If you have not optimized prior to or during the uploading process a full set of tools is available after uploading via the "Optimize" button: Resize, Rotate, Crop, Brighten, Add Fuzzy Edges, Add Beveled Edges, and Compress. The Optimize button is displayed next to each uploaded file.
Have ALL adjustments to photos completed before using them
To avoid confusion be sure to have the photos already in their desired display size prior to using them in FreeForm or FreeForm2. See "Reduce" above.
|
FreeForm / FreeForm2
Which is best for you FreeForm or FreeForm2?
Give FreeForm2 a try first at freeform2.robshelp.com. Look at the "Prefab Shells" to see the types of layouts available. The advantage of using FreeForm2 is it being faster, easier to learn, and easier to use. Plus it includes the sophisticated "MouseOver Enlarge" and "Enlarge in Place" photo sections that FreeForm doesn't. Here's a short video that demonstrates how quick and easy it will be to use EAPH hosting with a template created and stored in FreeForm2: FreeForm2 Demonstration
If FreeForm2 doesn't seem to meet your needs then turn to FreeForm at robshelp.com which is more flexible.
If you aren't sure then don't hesitate to ask before spending a lot of time figuring it out on your own! See "Requesting Assistance" below.
Accessing your images from within FreeForm or FreeForm2
In both FreeForm at robshelp.com and FreeForm2 at freeform2.robshelp.com wherever you are able to display images (photos or graphics) a button or link labeled "EAPH" or "EAPH.com" will be present. Look for and click that link or button to bring up a listing of your images to choose from.
In FreeForm you may be prompted to fill in your EAPH membername.
In FreeForm2 you will have needed to log in (see immediately below) prior to using the EAPH or EAPH.com buttons and links.
Saving and Loading in FreeForm/FreeForm2
With EAPH membership a superior (unlimited) method is provided for saving what you have created. You'll find it labeled as "EAPH Method".
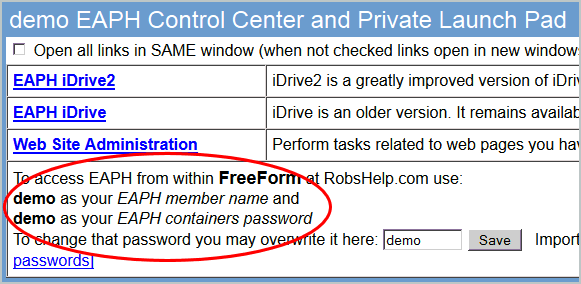
In FreeForm and FreeForm2 be sure to have your EAPH membername and "containers" password handy. The password may not be the same as that which you use to log into your EAPH. You'll find the containers password in your EAPH Launchpad page as in this screenshot:
In FreeForm you will not be asked for your EAPH member name and containers password until you perform saving or loading. In FreeForm loading a previously saved presentation is done from the top of the Builder page - click on the "An EAPH Save" button per this screenshot:
In FreeForm saving is done from the Preview menu accessed by clicking on any of the Preview buttons in the FreeForm Builder page.
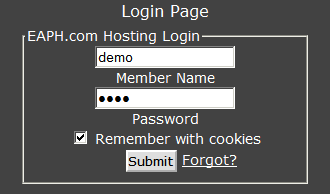
FreeForm2 is different. Immediately after having launched FreeForm2, in the right panel, you will see a box into which to type your EAPH member name and "containers" password per this screen shot:
In FreeForm2 after logging in look for boxes labeled "EAPH Method" with a button within to perform saving and loading.
In both FreeForm and FreeForm2, of course, there will be nothing to load using the EAPH Method until you have actually performed an EAPH Method save.
Requesting Assistance
Included with your EAPH hosting you have available to you as much help as you may need to create a great looking presentation template using FreeForm or FreeForm2. If that needs to include any special preparation of your photos then you'll also be guided with procedures to follow.
A spark is needed to light the flame of inspiration. That may be samples of layouts you like that other sellers on eBay are using. It may be a logo or banner you wish to use or even just a color scheme.
Ideally you will have at least one set of photos for an item uploaded to your EAPH hosting. It will also help to have started a layout in either FreeForm or FreeForm2. Just throw in the text and images any way you can then perform an "EAPH Method" save. The more desired "ingredients" present, the better.
Then write to the support email address rob@robshelp.com including your EAPH member name, eBay ID, and your instructions for the type of layout you desire. All you'll need at that point is patience as we work out the details and procedures through our email correspondence and prototypes that will be saved for you to use and adapt further in FreeForm or FreeForm2.
|