Photo Preparation - The Big Four:
Crop, Cutaway, Resample, Compress |
------------ |

More
Tutorials |
|
Arguably the most important goal for eBay sellers is to present a thorough and accurate photo representation of their items for sale. The purpose of this tutorial is to teach how to achieve that without necessarily displaying huge, slow loading images within the body of item descriptions using your own web hosting. Included are variations of the instructions for use with eBay hosting and for everyone with regard to the one (free) photo eBay uses for the gallery and for display in the eBay portions of the selling page.
I'm using Irfanview software for this tutorial. Irfanview is a popular and free download image viewer available here:
http://www.irfanview.com (link opens new tab/window)
which also happens to include two extremely important editing features: Superb resampling and the capability to fine tune jpeg compression via a 1-100 scale. You may prefer to use other software but it needs those two features if you are to obtain the best possible results.
|
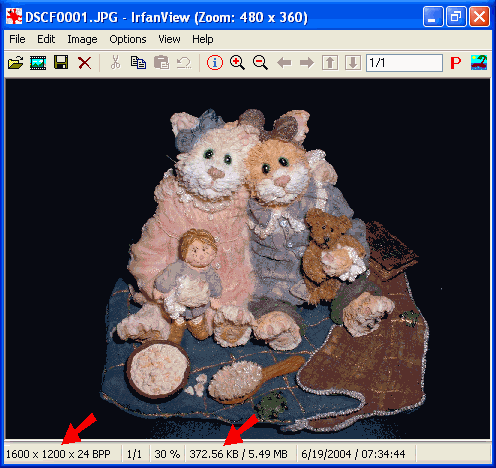 |
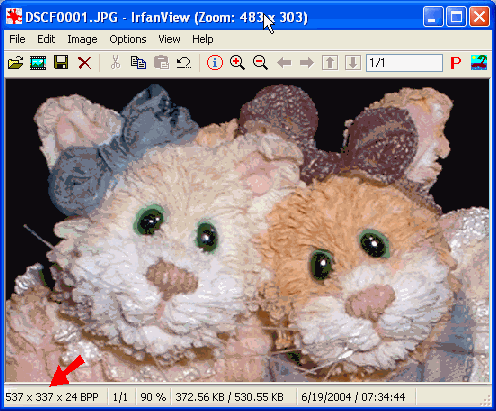
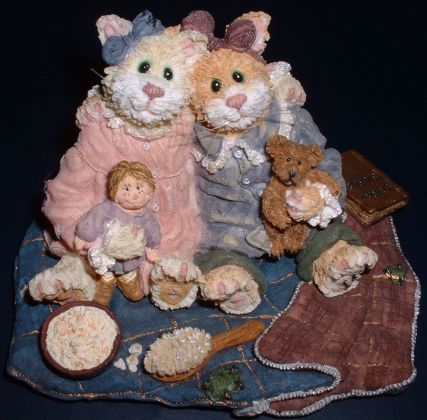
Here is the original size photo right out of the camera. I've used the zoom out feature in Irfanview to be able to fit the original into the editing screen, the red arrows point to the actual full size. |
|
I started with a photo shot with my 2 megapixel Fuji digital camera. Even at only 2 megapixels this camera produces a photo 1600x1200 pixels wide/high and, in this case, with a file size of 372KB. A photo that size would take at least 64 seconds to load when viewed over a dial-up Internet connection. Most of you are probably using 3 and 4+ megapixel cameras so are starting out with even larger, longer to load images.
You can see the photo in its original size if you like by copying and pasting this address into your browser:
http://www.eaph.com/iDriveHelp/CCC/DSCF0001.JPG
|
|
Crop - reducing an image to a region within the original
|
|
The first step is to crop away all but the subject of the photo. That can, in itself, make a big difference in display size.
|
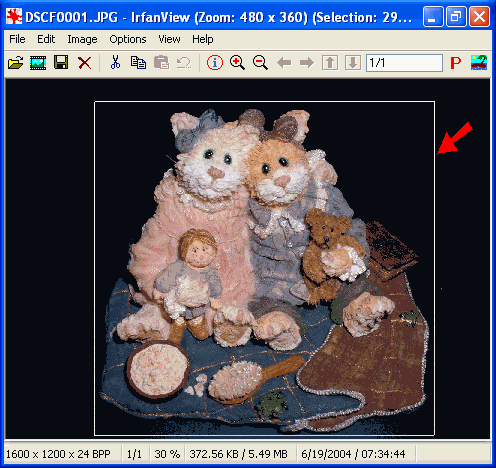 |
Here I am selecting what I want to keep by drawing a box around that part of the image. |
|
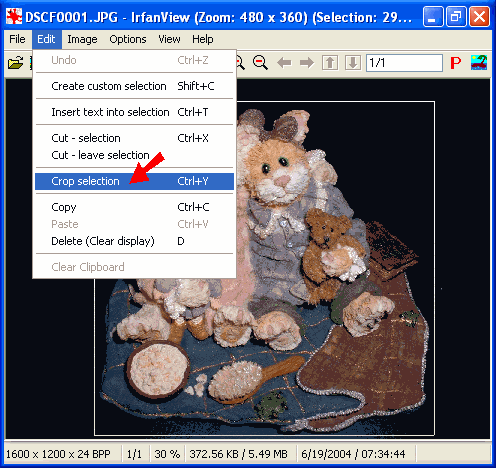 |
Here I am choosing ''Crop Selection''. With other photo editing software ''Crop to Selection'' may be used to describe what will occur -- all but the selected area will be removed. |
|
|
It is important to crop as the first operation performed because we want the subject of the photo to remain as large as possible after the photo has (ultimately) been reduced.
|
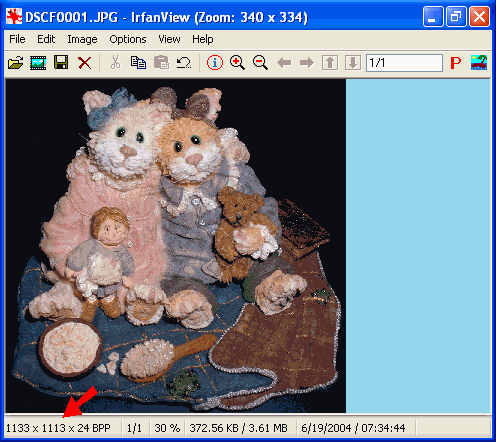 |
The dimensions of the photo are now 1133x1113. Still too big, but every little bit helps! The size in bytes has not changed because I have not yet performed a save operation. |
|
|
Cutaway - reducing an image to a region within the original with the purpose to display high detail or to focus attention on a feature
|
At this point I am again cropping but this time I am choosing a portion of the original I want to retain as a ''cutaway'' view. This is a great technique to use for showing fine detail or to focus shopper attention on important details without needing to display the entire item in high detail.
Ideally you would crop down to a region of the photo that is already small enough to avoid needing to resize/resample it. I am selecting a portion that is smaller than 640 pixels wide x 480 pixels high. Those dimensions are good targets because the result will fit comfortably on most computer screens.
|
 |
The red arrows point to the dimensions (in pixels) of the portion of the image I desire to keep and represents the dimensions of the selection I have drawn on the image (537x337). |
|
Variation for use as the first (free) photo given to eBay
For the picture that will be given to eBay and used for the gallery, consider composing the crop to be a perfect square even if some of the item gets cut off. eBay will be displaying that version of the photo in a space reserved for a square picture. As a result anything other than a square will not take up all the space and so appear relatively smaller.
Bear in mind the resulting eBay gallery version, square or not, will be rather tiny so you may only want to show whatever portion best portrays the item. In other words, showing the whole item might result in none of it being represented in an attractive manner. Your goal for the gallery picture is do whatever you can to entice a click.
In this case, because the upper portion is so cute in comparison to the lower portions of the item I'd either compose the square to include only their faces by making the crop above 537x537 or I'd make the square larger to include the doll and teddy bear along with the faces.
|
 |
Having made the selection I am choosing to crop the image down to that selected portion. |
|
 |
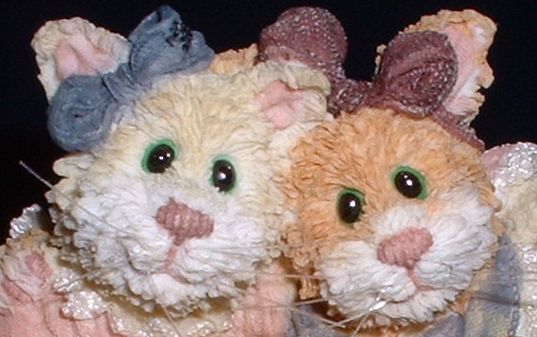
Here is the result of the cropping operation. It is still zoomed out a bit in the screen shot but you can see that the crop effectively produced a close up view. The red arrow points to the actual dimensions of the image (537x337). |
|
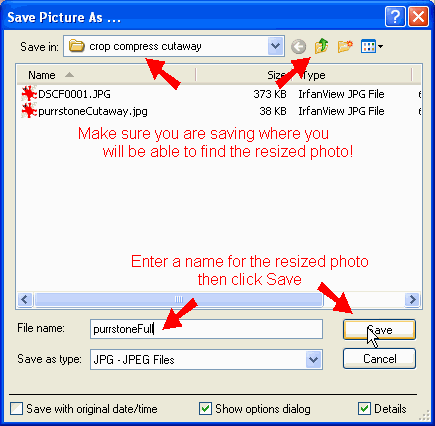
The cutaway is a ''keeper'' so I need to save it. I'm typing ''Save As'' here in big bold letters because you need to remember to use that:
Find and click ''Save As''
which with most software is located along the top menu under the heading ''File''.
Using ''Save As'' instead of just ''Save'' enables you to avoid overwriting the original photo by typing in a different file name. With most software you will also be presented with other options you won't find anywhere else in the software's menus.
|
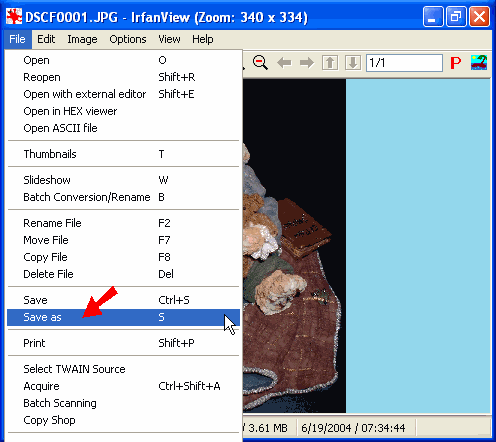 |
Click on ''Save As'' which with most software is located along the top menu under the heading ''File''. |
|
|
Save As options will appear differently with different photo/graphic editors. The goals are to: - Select jpg (jpeg) as the file type
- Find where you can adjust and apply compression
- Assign a different file name than the original
|
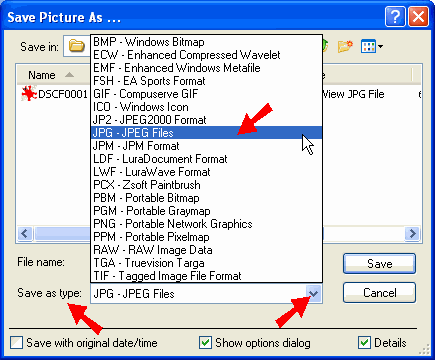 |
I've selected JPG (jpeg) as the file type |
|
|
Compress - reducing file size to improve loading time
|
|
The JPG file type provides for a variable level of compression. Determining the correct amount of compression to apply is a balancing act. More compression produces smaller (faster loading) files, less compression produces higher display quality. The goal is to end up with as small a file size as possible without losing too much quality. From experience I've learned with Irfanview that a compression level (Save quality) of 80 is a good place to start.
|
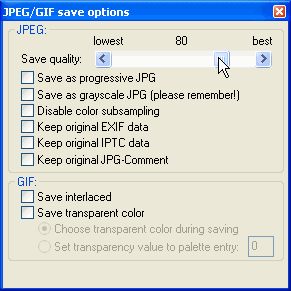 |
I've dragged the slider to 80 on the scale |
|
|
Once a level of compression is set (with some photo editors you may first need to click on an ''Options'' button), then it is time to enter a unique file name for the image to keep it separate from the original.
|
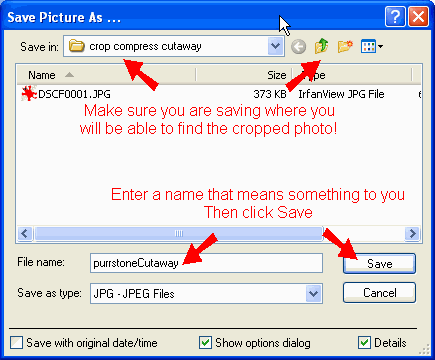 |
It is very important to assign a different file name for this version of the photo! |
|
|
Irfanview is not perfect for this purpose One major shortcoming of Irfanview is we are unable to see a preview of the effect any given level of compression will have on the photo. Higher end graphic editors, such as Paint Shop Pro versions 8 and higher, provide such a preview making them much more convenient to use. However, with experience you will learn what types of subject matter can accept less or more compression before the visual quality is impaired. In the meantime, although I did not do it with this particular photo, a good practice is to save several versions you can later choose between. To help identify them you would go through the ''Save As'' steps, select a different level of compression for each version, and save with a name that includes a reminder for the level of compression applied. For example, I might create five versions: PurrstoneCutawayC50, PurrstoneCutawayC60, PurrstoneCutawayC70, PurrstoneCutawayC80, PurrstoneCutawayC90.
|
|
Variation for use as the first (free) photo uploaded to eBay or when otherwise using eBay hosting: Only compress to the 90 quality setting. eBay will report a photo as not optimal when using a setting lower than 90.
|
|
This is the finished cutaway version of the photo. It is 537 pixels wide, 337 pixels high, with a file size of 37KB. Clear and sharp it will only take 6 seconds to load over a dial-up connection and will fit comfortably on virtually all computer screens.
|
|
Because I used the all important ''Save As'' to create my cutaway, the original remains available to continue working with. The last operation I performed on the photo itself was to crop down to the cutaway. By using the Undo button I can get back to the photo immediately before I performed that crop.
|
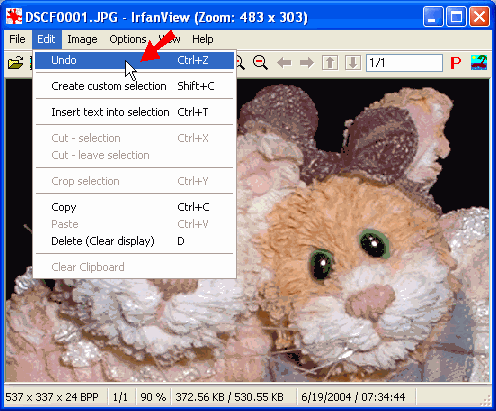 |
I am using ''Undo'' to get back to the full view of the item. |
|
|
I'm back to the overall view of the item. |
|
|
If additional cutaways are required this would be the point at which to perform them by repeating the steps above. I'm done so will go on to process the overall view.
|
|
Resample - resizing an image using a sophisticated filter method
|
At 1133 pixels wide and 1113 pixels high this photo will not fit comfortably on most computer screens so I want to reduce it.
(Note: I did not need to reduce the cutaway because I deliberately cropped down to a size that would prevent needing to)
When given a choice choose ''resample'' as opposed to ''resize'' and, when given a choice among methods, look for and choose the ''Lanczos'' method (filter). The Lanczos filter does especially well to prevent what is called the Moire effect - a distortion of patterns that may occur when reducing some images.
|
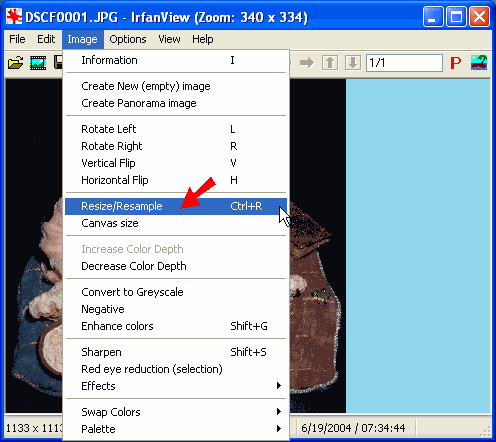 |
I've found Resize/Resample in Irfanview's main menu under ''Image'' |
|
Photo/graphic editor controls will appear somewhat differently but the steps are basically the same:- Preserve the original proportions of the image (aspect ratio)
- Specify the desired width or height
- Select the best resampling method available
|
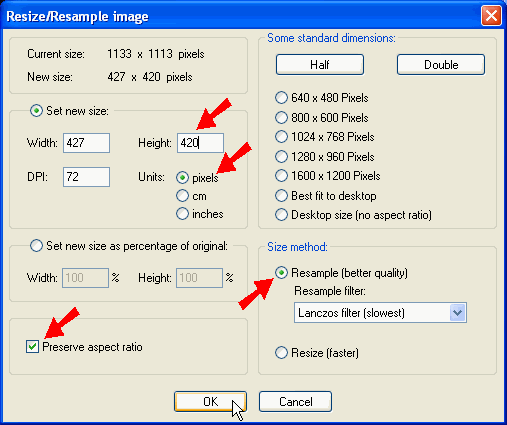 |
I am choosing to set the height to 420 pixels. Because the ''Preserve aspect ratio'' box is checked the width is automatically adjusted to remain in proportion to the new height.
I have also selected the Lanczos filter. |
|
|
My experience is most photos come out of the resampling process very well in the range of 560 pixels wide by 420 pixels high. As a rule of thumb try to keep them under 640 pixels wide by 480 pixels high so they will fit comfortably on most computer screens.
|
Variation if you are using eBay hosting
eBay recommends giving them photos in the range of 1,000 to 1,600 pixels on the longest side. That's to allow for the eBay option of supersize or zoom which use an 800 pixel on longest side version created by eBay. If your cropped versions are already smaller than 1,000 you may see a ''not optimal'' message. Supersize will still work but only out to the size of the photo you gave them. Zoom would not be available for that photo.
For the first photo, the one eBay will use to produce a gallery sized version, it is usually more important that you crop dramatically so it will display well in gallery size (even if that ends up smaller than 1,000 pixels). For others consider cropping to a lesser extent so they remain larger than 1,000 pixels on the longest side.
|
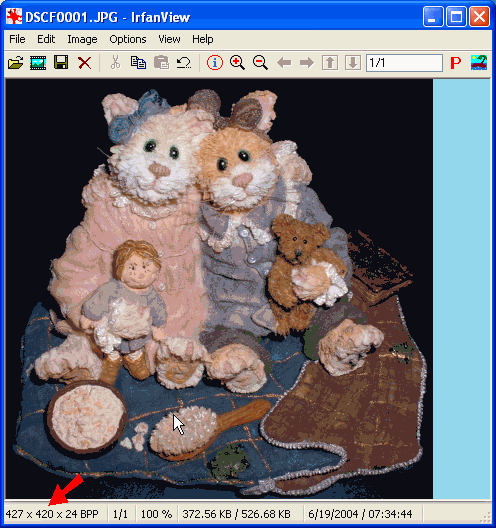 |
The result of the resample is displayed and the red arrow points to the new dimensions. 427 pixels wide by 420 pixels high. |
|
|
Now I'm running through the all important ''Save As'' routines just as I did with the cutaway above.
|
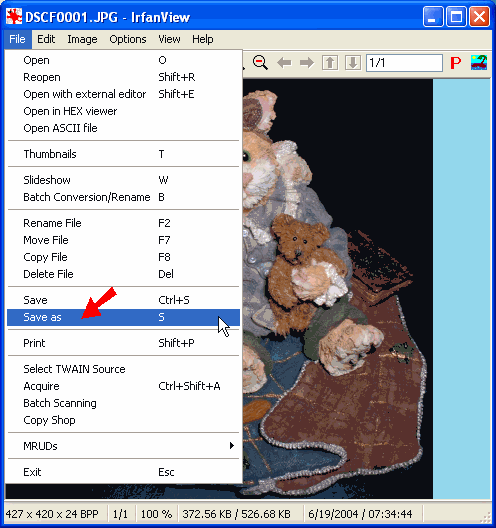 |
I'm choosing "Save As" from the File menu |
|
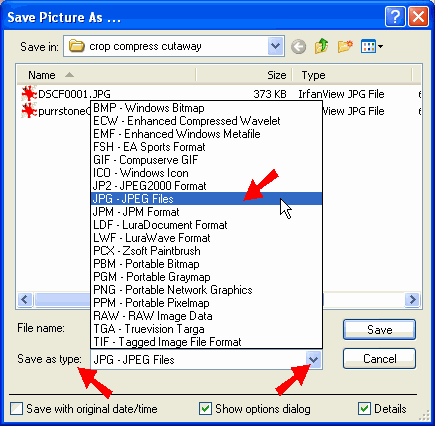 |
Selecting the JPG file type |
|
 |
Assigning the compression level |
|
|
Remember for eBay hosting choose 90 instead of 80
|
 |
and typing in a unique file name. |
|
|
Below is the end result full view. At 427x420 pixels, 38KB this will take about 6 seconds to load on a dial up connection and will fit comfortably on virtually all computer screens.
|
|
When displayed in combination with the cutaway view below, this item is well represented with the use of only one original photo.
|
|
Learning how to work with photos is a worthwhile effort for eBay sellers. Being able to present good photos without using large files is a major competitive advantage and, as with most things in life, will become easier and get done more quickly with experience.
|
|
A note to EAPH.com Hosting Members EAPH includes on-line Photo Optimizing Tools that enable you to perform the techniques described in this tutorial (only easier). However, if you have an unusually large number of pictures to work with or are using a dial-up Internet connection it will be more efficient if you use software like Irfanview that runs on your own computer.
|
|
Everyone Else If you are not sure you are squeezing every available bit of ''quality per byte'' from your photos consider visiting EAPH.com. You may use the demo of the service you find there to Optimize one of your photos. Compare the result with what you are able to achieve with your photo editing software as a measure of its performance.
|
|